17 Great Accommodations & Modifications
May 26, 2016
(This post is part of our Fair is Not Always Equal…Now What? blog series.)
As many of our posts have emphasized this year, designing your lessons using the UDL framework goes a long way toward meeting each of your students’ specific learning needs. But in a diverse, inclusive classroom, some students will also need accommodations and modifications to access the curriculum and express what they know. Today’s post gives you 17 practical tips from some of our expert authors. These won’t work for every child—uncovering a learner’s individual strengths and needs is always your first step—but they’re helpful ideas to add to your toolbox and use with the learners who can benefit from them.
[Not sure about the difference between accommodations and modifications? Start by reading Tuesday’s Q&A with inclusion expert Nicole Eredics, who shares the clearest definitions we’ve heard.]
- Break tasks into smaller steps. For independent work time, post a to-do list on the student’s desk (in words or pictures) of the big tasks that need to be completed. The student can complete them and cross out each task.
- Extend time on tasks. Slowly increase the time allotted for certain tasks, or allow the student to take a test in parts—one part on the first day, the second part on the next.
- Reduce the amount of information on a page. Adequate white space and a clean, distraction-free layout can make an assignment seem less confusing. Copy segments of an assignment onto different pages to increase white space. Students can also hold index cards or word windows on the page to limit information as they read.
- Preteach. Introduce a concept, term, or idea to a student before it’s “officially” taught to the rest of the class. This can help the student start the class feeling prepared and more confident.
-
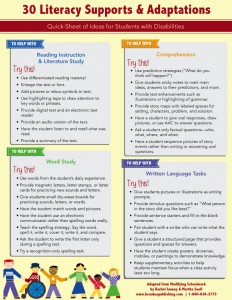
Click the image for more literacy supports! Let students choose their writing instruments and paper size. Instead of traditional pencils and full-size sheets of paper, offer choices. For example, one student chose a black felt-tip marker and a half-sheet of paper. He explained that he often got nervous if he saw “a whole blank piece of paper” in front of him, and that he hated “the feel of the pencil on the paper.” Changing up his writing materials proved to be a successful strategy—after making the switch, the student was able to write for longer periods of time.
- Use a timer. Some students need help organizing their time or perform better when they know exactly how long tasks will take. Using visual timers is a great accommodation strategy to support these students. Timers that allow the student to see how many minutes are left can be particularly useful for managing time.
- Use guided notes. Develop handouts to help students take notes. Create an outline of the lesson and replace key terms and facts with blanks that students can fill in as they listen to your presentation.
- Provide test-time helpers. Try modification strategies like adding picture cues to test items, highlighting important words in the directions or questions, providing an example for each type of test item, reducing the number of alternatives for multiple-choice items, and letting the student circle the answer rather than write the letter.
- Make an on-the-spot adaptations toolkit. Get a sturdy, reusable container such as a clipboard storage case and assemble your own toolkit for making creative adaptations. Some items you might include: peel-off address labels, sticky notes, lined paper, laminating sheets, index cards, colored cardstock, felt-tip markers, pencils, erasers, highlighters, pencil sharpener, three-hole punch, assorted paper clips and rubber bands, small stapler, glue stick, tape, scissors, dice, and batteries.
- Let students use signals to answer questions. Give students cards, signs, or other items they can use to respond to your questions during class discussions. You can make response cards that are preprinted with answer choices, or equip students with small dry-erase boards and markers they can use to write their own responses and hold them up when it’s time to answer questions. (Hint: orphaned socks make great whiteboard erasers!)
- Rock the vote. Pose verbal yes-no or multiple choice questions to encourage all students to respond more during group instruction. Students can vote with thumbs-up/thumbs-down signals or hold up colored index cards to indicate their answer (e.g., yellow for a, white for b, and green for c). This is a great way to facilitate more participation for nonverbal learners and students who are anxious or shy.
- Allow students to access text differently. Make modifications to the text itself—shorten the amount of text, reduce the number of vocabulary words, or simplify sentence structures. Or keep the text intact and provide accommodations such as text-to-speech books or audiobooks, highlighted text, or hyperlinks to vocabulary definitions.
- Use technology to evaluate text and make it more accessible. A few easy tools in Microsoft Word can help you make text more readable and accessible. AutoSummarize can summarize key points in your reading material, and Readability Statistics can count the number of words and paragraphs, average the number of characters in a word or number of sentences in a paragraph, and calculate the readability of the text you’re giving your students. You can also use text-to-speech functions (available in many word processing programs) to enable text to be read aloud.
-

Click the image for a peer buddy program success story Assign and prepare peer tutors. It can be difficult for a general education teacher to work individually with children with disabilities while also meeting the needs of the whole class. To provide additional support, peers without disabilities can be taught how to provide extra help for their classmates. Peer tutoring not only provides increased practice and reinforcement for students with disabilities, but also promotes stronger social skills for all students and encourages friendships.
- Help students stay on task with Countdown Strips. Many students, especially those with autism and ADHD, will find it easier to stay on task if an activity has a clear and observable endpoint. Use a Countdown Strip for them—a visual support that allows students to count down how many times they must complete an activity or how many parts the activity has. Countdown Strips are easy to make; they can be as simple as a clothespin and a strip of paper printed with the numbers 0 to 10. Each time an activity or a section of the activity is completed, the student moves the clothespin to the next number until the he or she reaches 0.
- Eliminate distractions to improve focus. Reducing the presence of extraneous noises, people, or objects can help students with disabilities focus on important instructional cues. To help students maintain focus, position them so they’re facing away from distractions and hold off on introducing items or equipment you won’t be using until later. For example, in a physical education class, balloons and cones set up for a later activity might be extremely distracting for some students. Avoid setting up equipment for activities beforehand, or keep the materials covered with a tarp until they’re needed.
-
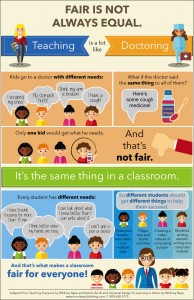
Click the image for a FREE Fair is Not Always Equal poster! Tell a “fair is not always equal” story. When you implement suggestions like the ones outlined in this post, some of your students might ask questions like “if Jimmy gets extra time on the math test, why can’t we?” Tell them a story to illustrate the why behind modifications and accommodations. For example, one teacher told a vivid, engaging story about a mother who had seven children, all of whom had different strengths and needs. Because the mom didn’t want to be unfair to any of her children, all seven of them had to take tap dancing lessons, join the swim team, use an inhaler for asthma, wear glasses, watch basketball, and read only fiction books—no nonfiction allowed! By the end of the story, the students were laughing about the absurdity of it all. To drive the point home, the teacher explained that supports and services are provided to meet the specific learning needs of students, whether that means assisting a student with a broken arm or accommodating a documented disability. Through the story and the teacher’s explanation, the students began to understand the real meaning of “fairness”—and trust that their teacher would do a great job meeting the needs of everyone in the class.
What are some favorite accommodations and modifications you’ve used? Tell us in the comments below!
Credits: Suggestions #1-6 from The Educator’s Handbook for Effective Inclusive Practices by Julie Causton; #7-11 from Modifying Schoolwork by Janney & Snell; #12-13 from Maximizing Effectiveness of Reading Comprehension Instruction in Diverse Classrooms by Berkeley & Barber, #14-16 from A Teacher’s Guide to Including Students with Disabilities in General Physical Education, Fourth Edition, by Martin E. Block; #17 from The IEP Checklist by Winterman & Rosas, all from Brookes Publishing Co.
KEEP READING
10 Worst Modifications for Students with Disabilities (and 100+ Good Ones!)
Accommodations and Modifications: A How-To Q&A with Nicole Eredics of the Inclusive Class
Topics
More posts like this
Two Approaches to Teaching Core Content to Students with Significant Disabilities
March 19, 2024
10 Quotes on Teaching Multilingual Learners
March 14, 2024
Write a Comment
Your email address will not be published. Required fields are marked *
Post a Comment